 So last week I wrote about discovering Pinterest and becoming an instant addict. The fun continues! This week I have been completing little Pinterest Projects all over the place. I made Darby a One Sentence Journal for documenting her high school years as well as a Dream Bucket. Although I am very proud of those two items, this fun Tissue Paper Lamp was the winner of my week. To boot, Darling Daughter loves it too! Yay, J-Me!
Supplies: Balloon, tissue paper strips in multiple colors, tacky glue, lamp socket kit from Lowe's and a light bulb.
1. Blow up the balloon and use tacky glue to adhere the twisted paper roses to the balloon. To make the rose, cut a 2 inch x length of the tissue paper strip. Twist the strip into a long tissue rope. Tightly roll the strip into a circle, creating your rose.
So last week I wrote about discovering Pinterest and becoming an instant addict. The fun continues! This week I have been completing little Pinterest Projects all over the place. I made Darby a One Sentence Journal for documenting her high school years as well as a Dream Bucket. Although I am very proud of those two items, this fun Tissue Paper Lamp was the winner of my week. To boot, Darling Daughter loves it too! Yay, J-Me!
Supplies: Balloon, tissue paper strips in multiple colors, tacky glue, lamp socket kit from Lowe's and a light bulb.
1. Blow up the balloon and use tacky glue to adhere the twisted paper roses to the balloon. To make the rose, cut a 2 inch x length of the tissue paper strip. Twist the strip into a long tissue rope. Tightly roll the strip into a circle, creating your rose.
 2. For an extra measure of security, I sprayed the rose-covered balloon with a matt finishing spray. Let the project dry for 24 hours.
3. Once the lamp is completely dry, gently cut the balloon and let it deflate. I had to gently remove balloon bits from inside the lamp shade. It looked like one of those flower-covered swim caps from the 50s.
4. I then cut a hole in between a couple of the top roses to insert the socket of the lamp kit. I screwed in a light bulb, plugged it in, and ta-da! A funky light for darling daughter!
2. For an extra measure of security, I sprayed the rose-covered balloon with a matt finishing spray. Let the project dry for 24 hours.
3. Once the lamp is completely dry, gently cut the balloon and let it deflate. I had to gently remove balloon bits from inside the lamp shade. It looked like one of those flower-covered swim caps from the 50s.
4. I then cut a hole in between a couple of the top roses to insert the socket of the lamp kit. I screwed in a light bulb, plugged it in, and ta-da! A funky light for darling daughter!
I used to think that my once-a-year Garage sale was genius because, instead of pricing each individual piece of crap, I would give out the grocery sacks we collect all year for $5 and tell our patrons, "Anything you can fit into that sack for $5." I cleared out our bag collection and our junk at the same time. Well if that was my genius, then this is whatever is WAY SMARTER AND COOLER than genius.
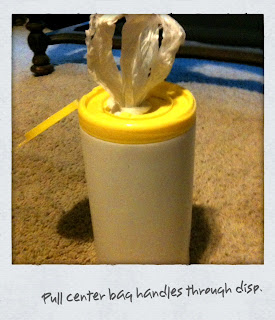
Originally pinned from "Tatertots and Jello", a blog of DIY crafts and ideas, this is a tutorial for taking your grocery bags and an empty cleaning wipe container and making a dispenser for your car, your laundry room or your mommy bag! It makes that jumble of plastic sacks a neat and compact bag dispensary! Hubby dearest was a doubting Chad until I let him demonstrate with my finished product. Now he wants one for his truck and his dad's boat!
 1. Gather a dozen bags and flatten them
out pushing all the air out. I used several more than 12 because my container
was the large wipes.
1. Gather a dozen bags and flatten them
out pushing all the air out. I used several more than 12 because my container
was the large wipes.
 2. Fold the bags in half again pressing
all the air out. This took me a couple of tries.
2. Fold the bags in half again pressing
all the air out. This took me a couple of tries.
 3. Overlap the handles of the bags onto
the top of the previous bag. If you’re only working with 12, then you can make
a long line. If you’re doing more, you may just want to work with a few at a
time.
3. Overlap the handles of the bags onto
the top of the previous bag. If you’re only working with 12, then you can make
a long line. If you’re doing more, you may just want to work with a few at a
time.
 4.
Fold the first bag’s handle upward.
This will be your middle and the first bag you pull out of the container. All
the other bags will be connected to this first one.5. Tightly roll up the sacks, tucking
in the new handles as you roll.6. After you roll the grocery bags, insert
the roll into your wipes container, tucking the first bag’s handles through the
top.7. From here, you decorate your
wonderful little container using whatever supplies you have available. GENIUS!
4.
Fold the first bag’s handle upward.
This will be your middle and the first bag you pull out of the container. All
the other bags will be connected to this first one.5. Tightly roll up the sacks, tucking
in the new handles as you roll.6. After you roll the grocery bags, insert
the roll into your wipes container, tucking the first bag’s handles through the
top.7. From here, you decorate your
wonderful little container using whatever supplies you have available. GENIUS!

 So last week I wrote about discovering Pinterest and becoming an instant addict. The fun continues! This week I have been completing little Pinterest Projects all over the place. I made Darby a One Sentence Journal for documenting her high school years as well as a Dream Bucket. Although I am very proud of those two items, this fun Tissue Paper Lamp was the winner of my week. To boot, Darling Daughter loves it too! Yay, J-Me!


