Showing posts with label Crafts. Show all posts

Tuesday, July 17, 2012

Craftastic! Couple's Shower Invitations

Much to my future brother-in-law's chagrin, La-La (sister-in-law) has decided she wants a couple's shower. I tell you what, gentlemen! Don't fret...they usually aren't that bad. When you join in the fun, there are usually gifts for you too...GASP!

The invitations needed to be simple but elegant if I was going to be a happy hostess. At Michael's, I found a Sizzix Embossing Folder with curlie cues, four packages of coordinating paper flowers, glue dots called Zotts, and a block of fall colored stationary cards and envelopes...all for around $50 for 200 invitations. Luckily, we only need 100 of the little gems so I have extra card making booty! Yay, me!

Now, let me tell you what is what! If you have the original Sizzix (giant red block of hard plastic with a lever and a thin board), these new embossing folders won't work without some finagling. Luckily for me, I have a genius Hubby Dearest! After a fruitless but thorough search of the garage for wood to supplement the space needed to make the impression with the folder and my old lever-operated Sizzix, we opted for a stack of index cards. Southern Engineering wins again!

Not one of the invitations is the same aside from the wording (NOT an Aunt J-Me original...Darling Daughter googles well):

Here comes the bride, here comes the groom. Let's shower them with gifts from room to room!


DD cut out the card stock center information, and I embossed the 4x6 cards. Using the glue dots attach the two pieces and pick out your paper flowers. Pick an envelope and you're good to go. Easy peasy! Now I have time to focus on the food and flowers and games.

Yay me???

Friday, July 13, 2012

Handcrafted Jewelry

Supplies:
Sculpe Light
Cookie cutters
Rubber stamps
Ink/paint
Modge Podge
Beading String
Clasps


Darling Daughter is modeling the homemade jewelry I made for her in May while I wasn't social networking.

In my efforts to find camp-friendly crafts, I was attempting to make it trendy and cool. Using the lite version of the molding clay allowed it to set in three days of air drying so no oven needed. I used rubber stamps to imprint designs and tooth picks to write the words.

On day three I swiped each bead and pendant in paint and smudged it off so only the imprint kept the ink. I left a bit much on some. After a day of curing, I covered each little gem in Modge Podge.

Once it was all dry, I strung them together to make the bracelet and necklace. Alone, the pieces look like errant cereal. Together, not too shabby. Hubby Dearest and I think using the bake-able molding clay might make this seem more crafty and less kiddie. Also, this may be a better activity for little gals. My teen was only humoring me. :-(

Thursday, July 12, 2012

Thursday Scrawl: You are CRAFT-TASTIC too!

Today is my Daddy's birthday! In honor of the craftiest man I know, I have been having a CRAFT-TASTIC week. This week in the blog, I have been sharing some of my craftiness with you. Now it is your turn to share with me! Provide a link to your tutorial of choice (preferably, something you have either created or re-created). It's Craft-Tastic! Happy birthday, Daddy! I dedicate this song to you.

Wednesday, July 11, 2012

Rain Stick Tutorial

IT'S CRAFT-TASTIC WEEK AT AUNT J-ME SAYS SO!


If you have ever lived through a summer in Texas, then you understand the lack of rain. You might also understand my desire to make rainsticks. You might have empathy for me if you, like me, have purchased iTunes files with rain falling. I sleep much better when my brain thinks it is raining outside; it's probably related back that the whole germphobia ;-).


It is a widely accepted idea that if you sing "Johnny Appleseed" and/or shake your rain stick, it will start to rain. To test this theory a few weeks ago at GS Camp, I rode around camp singing, "Oh! The LORD'S been good to me and so I thank the LORD for giving me the things I need like the sun and the RAIN and the appleseed!" all the while shaking a home-made rain stick. It rained...no lie...it was the last day after all the campers left, but it rained. I thought I might have to swim home.


So to encourage the wettest summer on record, help a gal out and let's make homemade rain sticks today! The New Oxford Dictionary tells us the following: a rainstick is a percussion instrument made from a dried cactus branch that is hollowed out, filled with small pebbles, and capped at both ends. When slightly tilted, it makes the sound of falling rain. It originated in Chile, where native people had long used the sticks to serenade the gods in hopes of bringing rain. My hubby dearest is on the look out for a bamboo that he can dry out and hammer in nails so I have a Fancy-Nancy rainstick that lasts. However, let's go simple and use things you have around your house today!


Materials for the Non-Fancy-Nancy Rainstick:
empty paper towel roll
straight pins
masking tape
rice, beans, or buttons
shoe polish if you want to make it look authentic

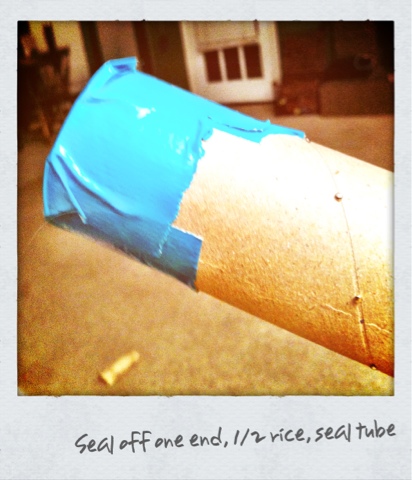
Poke your pins in a spiraling pattern down your empty paper towel roll. Use the masking tape to close off one end of your roll. Pour in your noise makers (I like rice!). Use more masking tape to close off the other end of your roll, securing your rice inside the roll. Now, at camp, I ripped more masking tape and layered it onto the roll to give a kind of log texture to the roll. I also gave it a light coat of shoe polish. Once this dried, My Daddy couldn't tell it wasn't a real stick. Either that or he was just making me feel good!


Monday, July 9, 2012

Paracord Survival Bracelet Tutorial

IT'S CRAFT-TASTIC WEEK AT AUNT J-ME SAYS SO!

The be-all-end-all craze at GS Camp a few weeks ago was the Paracord Survival Bracelet. You know how it works...older girls get this craft because it requires more fine motor skills and all the little girls want to be like the older girls. Heck even this old lady wanted to learn. The joke was on me though! Turns out the gal who can pick up almost anything crafty and run with it was a little deficient in the following directions area. In my defense...it was 2 a.m. after almost 20 hours on my feet in the heat. Thank you to Shutterbug, TuTu, and Lefty for your patience (and jabs) to encourage me to keep trying. "Hi! My name is Dory...have we met yet?"

After a night of rest and several hours working on a sample in private, I finally got the hang of it. In fact, I went a little nutso (NO! NOT ME!) making dog collars, key fobs and bracelets once I arrived home.
Supplies:
  • Paracord, or equivalent 1/8" diameter cord (I visited the Army Navy store! $.12/foot)
Tape measure or ruler

Sharp scissors

Buckles (also at the AN story, $.50/each)

Lighter (we used a wood burning tool at camp)

The length of paracord varies depending on your project. The best rule of thumb is 1 in. = 1 foot of paracord needed.


1. Measure your wrist, neck, etc.

2. After you cut your length of paracord according to the measurement you took, fold the cord in half to find your center. Using a larks head knot, attach your paracord to one side of your buckle.

3. Okay, because this is the only way I know how to say this, your buckle has an "inny" and an "outy" part. Release the buckle and run your paracord through whichever end you haven't already used. Pull that part of the buckle to the length you need plus one inch for good measure (ie...your wrist is 8 inches, then make it 9 inches).

4. Now laying all parts flat, you should have two center pieces attached to your other part of the buckle and then two long free-flying pieces on either side of those center pieces. The knot is called a "cobra" stitch; if you know it, then you're good to go. Go here for FABULOUS photos (and better instructions). STORMDRANE writes, "Take the cord on the left side and place it under the center strands running between the buckle ends. Now take the cord on the right side under the left side cord, over the center strands, and thru the loop of the left side cord. Tighten up the cords so the half knot you just formed is next to the buckle. Now take the right side cord under the center strands. The left side cord goes under the right side cord, over the center strands and thru the loop of the right side cord. Tighten up the cords(not too tight, just until they meet the resistance of the knot) and now you have a completed knot. You will continue doing the alternating the left and right sides as you go. If you don't alternate, you'll quickly see a twisting of the knots, just undo the last knot and alternate it to correct." JUST GO TO HIS INSTRUCTABLE...IT'S AWESOME! Or go ask ShutterBug...I bet if you hire her to be your photographer, she'll teach you! ;-)

5. At the end, use your lighter to melt the ends of your paracord to keep them from fraying.

NOTE: I made the key fobs with experimentation, using the scraps that were not long enough to make another bracelet. StormDrane also has other patterns...I think the fish braid is a real wowie zowie!


Monday, July 2, 2012

Father's Day Pressie Art

NOTE: I can't believe I forgot to take a picture before I gave this to my Daddy...I'll repost later with a photo!

Being a good southern belle, you have to know that my mother and father will always be Mama and Daddy. My Daddy is a quiet man...he says, "I stay out of trouble if I keep my mouth shut." I know the truth though. He listens first and saves his words for the truly profound (kind of like Ferb from "Phineas and Ferb" and Mitchell from "Swamp People" God rest his soul). I wish I had learned to do the same.


My Daddy wants for nothing, which makes gift giving dang near impossible. However, in my Modge Podge addiction, I made something he would truly adore. I started thinking about past gifts I had given Daddy and made a list of the ones he truly loved. Every time, my memory kept coming back to a piece of art I made in college when I was healing from a broken heart. This thing is hideous and reminds me of the sadness that created it. I have taken every opportunity to secretly dispose of it like when my parents moved into my grandmother's home while they built their new home and again when they were moving into their new home. It somehow escapes my clutches like a slippery eel. I have abandoned any hope of disposing of it, mostly because my Daddy loves it so.


For this father's day, I combined one of Daddy's favorites past times, working the daily crossword puzzle, and his attachment to my art (BTW he has pieces from when I was a little girl too...a board with a flowery hillside painted on a plank of wood, a skillet with something on it...can't remember) and created a crossword puzzle using all of his beloveds' names.


Step 1: Tear pages from a weathered dictionary and circle in red the words that matter (love, family, ketchup, etc.).
Step 2: Modge Podge the pages in a scatter on a flat canvas.
Step 3: Coat the canvas in a lite layer of white paint. I went back and swiped over the words with a wet paper towel so that the circled words would stand out a little more. This gave a nice white washed appeal.
Step 4: I googled Crossword Puzzle Maker and found this site. I printed out the puzzle it created and then Modge Podged the puzzle onto the canvas. I through in "family" and "love".
Step 5: Using a straight edge and a pencil, you can draw the grid onto your canvas, use a black paint pen to make it stand out, and then write in each of your names/words. My lines weren't coming out like I wanted so I opted for cut and paste.
Step 6: I slathered on a layer of Modge Podge and let it dry.
Step 7: I went a little crazy with the flourishes in black, gray and yellow paint.
Sep 8: Layer on one more coat of Modge Podge and seek out a frame.

Monday, May 21, 2012

DIY Wedding Invitations--No Set Pattern

In 1994 when Hubby Dearest and I met at 19, his youngest sibling, LaLa, was only 8 years old. You can imagine that her getting engaged last October and setting the date for this next October makes both of us feel quite old. I try not to focus too much on it since we adore her groom to be and pray they will be happy. Neither here nor there to today's post.

LaLa and I mesh on pretty much everything when it comes to weddings and such so I wasn't surprised when she said, "I pretty much want to remake your wedding." There are little differences here and there, and I am sure as we go more will arise. I have to say that the invitation idea is spectacular!
LaLa, Mom-in-Law, BridesmaidJ and I all gathered together yesterday to make invitations. LaLa brought sunflower stamps, a fall colored scrapbook stack with her chosen scheme of orange, country blue and browns, stamp colors and markers in the same hues, some ribbon, and various add ons from my plethora of swag. The best part was that LaLa just told us to go nuts. No two invitations will look alike. You would think that would cause an issue but as I watched the ideas unfold and everyone trying new things, I saw a collection of beautiful pieces of art being created.  

The down side of this is that everyone eventually ran out of creative juices. We have 15 down and around 85 more to go. At this rate we should finish the first week in August...that's about right for leave time, right? The kicker is that I also need to be getting the shower invitations together as well. That bad boy is August 11 so I may just make them all the same.

Hubby Dearest did have a pretty inspired idea of his own. He was joking with us about just sending an e-vite and being done with it. I remarked that with all the "green" initiatives, we could probably get away with it without too much "That's tacky" fall out. He also suggested that we could use the Bump-It App and bump the wedding programs onto everyone's smart phones as they arrived at the venue. These are not bad ideas if you have a pretty tech savvy guest list. Oh the world to come...

Monday, January 30, 2012

Felted Sweater Craftiness--Purses!

Named for my favorite book nerd, the Sosie
 bag can be used as a tote for books, crafts,
or as a Eco-friendly shopping bag.
While looking for patterns of purses that I could crochet and felt, I stumbled upon a neat idea...use 100% wool sweaters from thrift stores. It's called "upcycling" if you're hip like that. I call it genius because the Goodwill and Salvation Army thrift stores have already washed the donations in hot water and dried them on high heat just to kill any cooties. They are all five sizes to small and what toddler would stand to be dressed in scratchy wool? Here are my creations from this weekend! MyMama has claimed the Blue Gayla and my IPad is cozy in the Jeremy. Let me know if you want one of the others! Read the next post to get the how-to!

SPECIAL NOTE: I have a plan to make some felted sweater footie socks and call them Mike...I just ran out of time and wool sweaters!

Probably my favorite new craft, the Gayla purse is fully lined and
has an inner pocket for your cell. The lining is made from patterned shirts

Grey Gayla Purse


Jeremy IPad Envelope
This swanky iPad envelope is an upcycled felted wool sweater.
 I embroidered the argyle pattern to give it texture. It's named
Jeremy for my techno-cool brother of the heart.


I named this one Annie for my soul sista, Mrs. Berryhill.

Felted Sweater Craftiness

Start with a felted sweater
(100% wool washed in hot water
and dried and ironed on high heat).


Cut the arms and neckline out
to make the handles of the bag.


Sew the bottom of the sweater
closed to create the floor of the bag.


Use the excess material to create
a pretty floral design. I also used
one of the sweater's cuff to
make an inside pocket, using
fabric glue to adhere.